Tools and Tips
Marsh coring—portable, rapid, and perfect core recovery
For marsh coring, I am interested in an easily portable coring solution that can give me rapid and perfect core recovery for up to a few meters depth. Additionally, only a small crew of three people should be necessary to operate and carry the gear so it can be used for rapid exploration. While a vibracorer might be thought of as the optimal tool for a marsh environment, it definitely isn't something one uses for rapid exploratory work. The gouge auger, on the other hand, is the epitome of portability and rapidity, but the recovery is not perfect, cores are limited to 1 m length sections, and sample size maxes out at 6 cm diameter cores.
Here's an intermediate solution that I have developed for taking undisturbed, 2-3 m long, wide diameter marsh cores that gives me perfect core recovery, and is extremely portable and rapid. Let me stress the rapidity—recently, I used this technique to take eight, ~2 m long cores on a ~50 m spaced grid, and we accomplished this in just four hours using only three people! I use "Schedule 40" PVC tubing because it is sturdy, but I'd eventually like to try it with thinner-walled drainage tubing which is lighter and cheaper.
Below you can find a step-by-step explanation of this technique.
Steps for preparing a 10 cm (4") diameter PVC tube with a core catcher:
- get your "Schedule 40" PVC tubing and shim metal stock (steel); sources for shim stock include Lyon Industries and Precision Brand; you need a shim thickness that is sufficiently pliant that it will not gouge down the side of the core during driving, but also that is strong enough so as not to collapse/invert on core extraction; I have used 0.010"/0.254 mm thickness shim, but if you find that another thickness works better, I'd be happy to hear about it; preferably go for the 12" wide rolls because if you use the 10 cm (4") wide core catcher template I have provided below, you can get three strips out of it; so the part number you will need is either "CRW-10" (Lyon) or "16AA10" (Precision)
- gather the following tools: two "Vise-Grip" style pliers, an electric drill with an 1/8" bit, a pop rivet gun with 1/8" diameter pop rivets, a tool of your choice to sharpen/bevel the end of the PVC tubing; a small trim router with a straight beveled bit works great, but you can even use just a simple, coarse sanding disk with the electric drill, tin snips to cut the shim metal, heavy-duty wire cutters, and a sheet metal bender (if you happen to have one of these)
- cut your core catcher from the shim stock using the tin snips; I have constructed a template for 10 cm diameter PVC tubing which you can download as corecatchertemplate.pdf
- fold the core catcher along the fold axis line about 45°; if you have a sheet metal bender, this is easy to do, otherwise you'll have to improvise; one possible solution is to sandwich the shim stock between two pieces of trim board that are tightly fastened by C-clamps; this could also give a nice crisp fold with some practice; finally, note that this is a one-time opportunity—if you bend the shim stock back and forth, it will just snap off
- sharpen the end of the PVC tubing with the small trim router (or the tool of your choice)
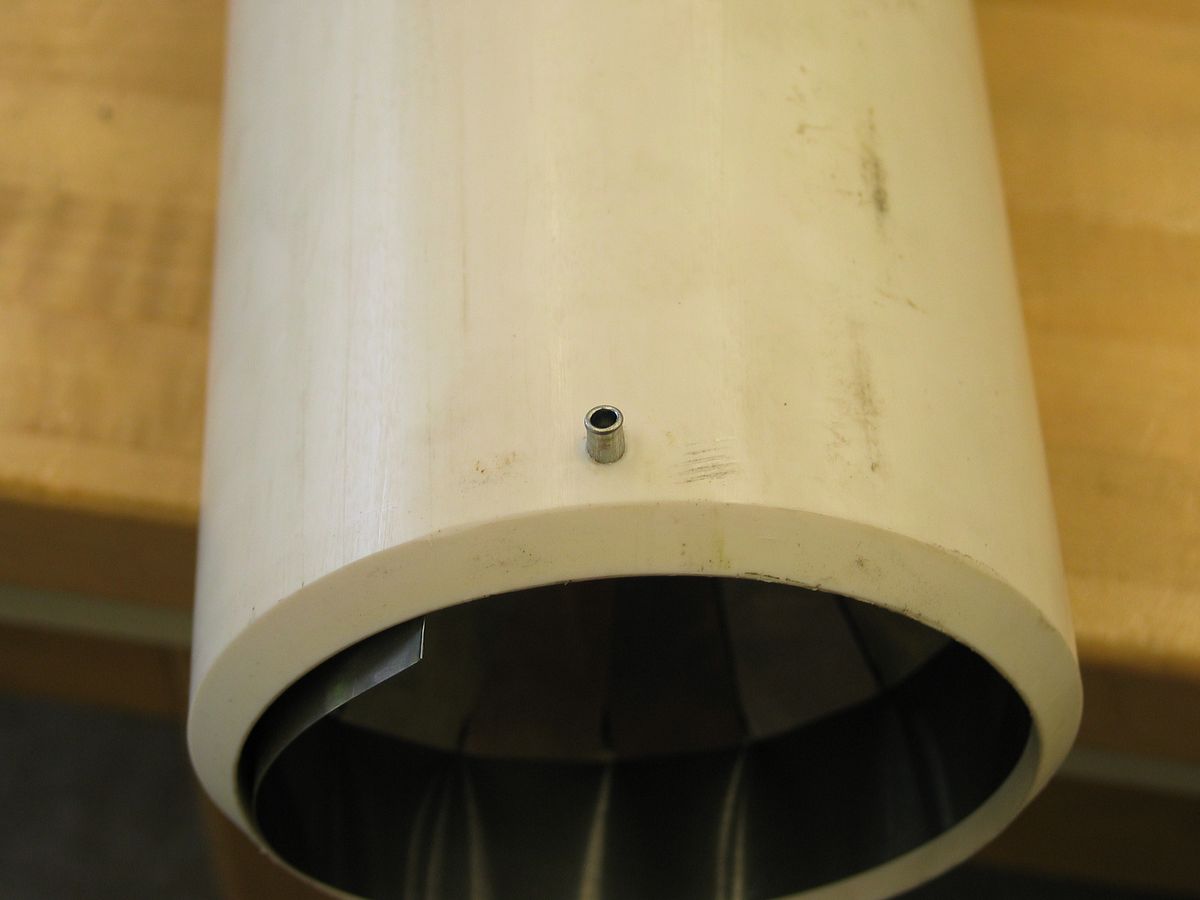
- using pop rivets, fasten the core catcher inside the PVC about 1 cm up from the base of the tube; you need the two Vise-Grips to get this done if you want to maintain your sanity; basically, you have to work progressively around the core barrel putting in one rivet at a time; start with the untabbed end of your core catcher about 2.5-3.0 cm down its length (if you do it at the very end of the untabbed side, your will not be able to seat you final double rivet on the tabbed end, which will overlap and fasten the untabbed end); use closely spaced Vise-Grips (separated by just 1 cm or less) to hold the shim metal flush against the inside of the PVC; drill an 1/8" hole through the PVC and shim stock between the Vise-Grips, and fasten with an 1/8" diameter pop rivet (smooth surface of rivet on inside of core); move the vise grips over about 2.5-3.0 cm, and do the same thing there; progressively work your way around the tube adding rivets; use a double rivet for the tabbed end
- cut off the overhanging portion of the pop rivets on the outside of the core barrel with the heavy-duty wire cutters
- this is probably obvious, but do not try to test the core catcher by inserting your finger or hand—the results will be unpleasant...
A picture is worth a thousand words so here's a visual guide for the process of preparing a PVC tube with a core catcher. Though this process is for 10 cm diameter tubing, you can easily adapt it to other sizes. Clicking on the thumbnails below will pop up larger images.
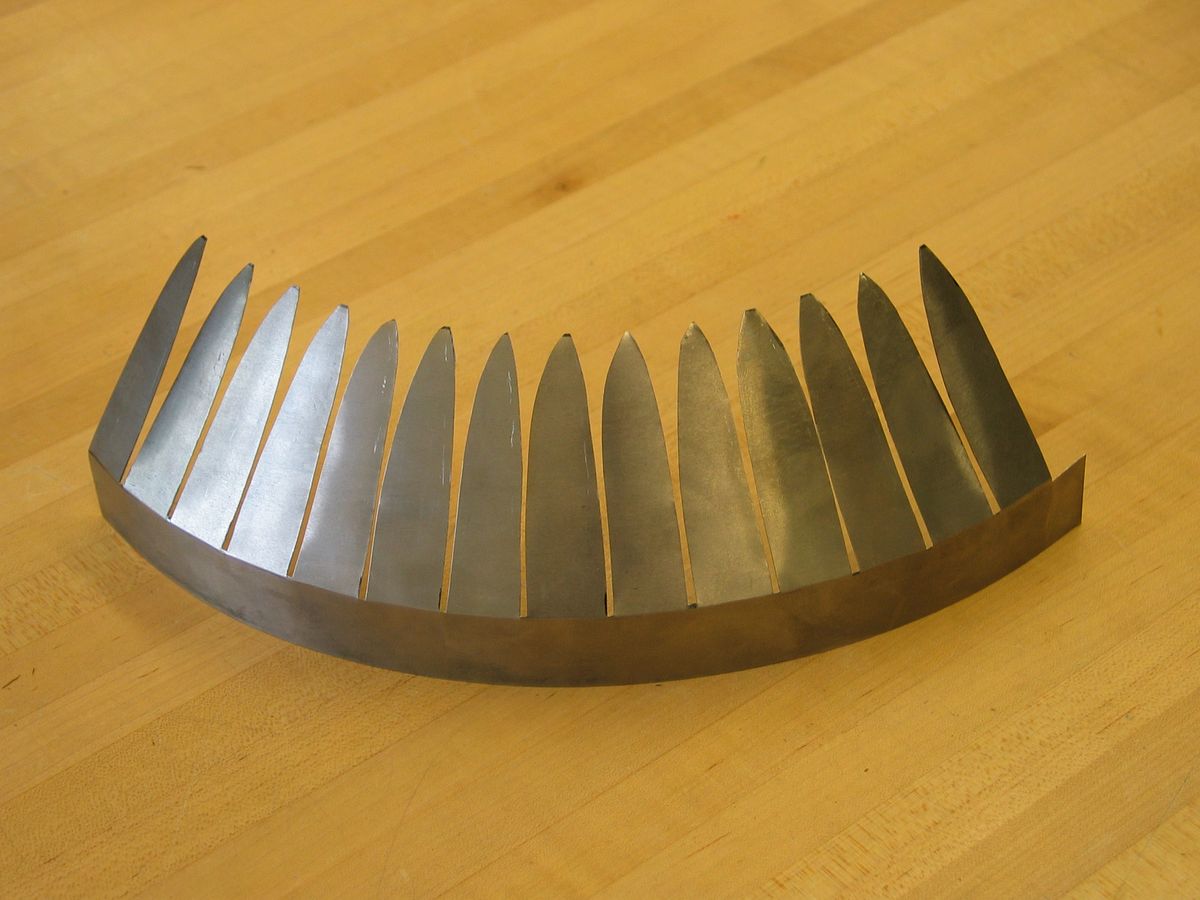 the core catcher cut out, and with the fingers bent in at about 45° |
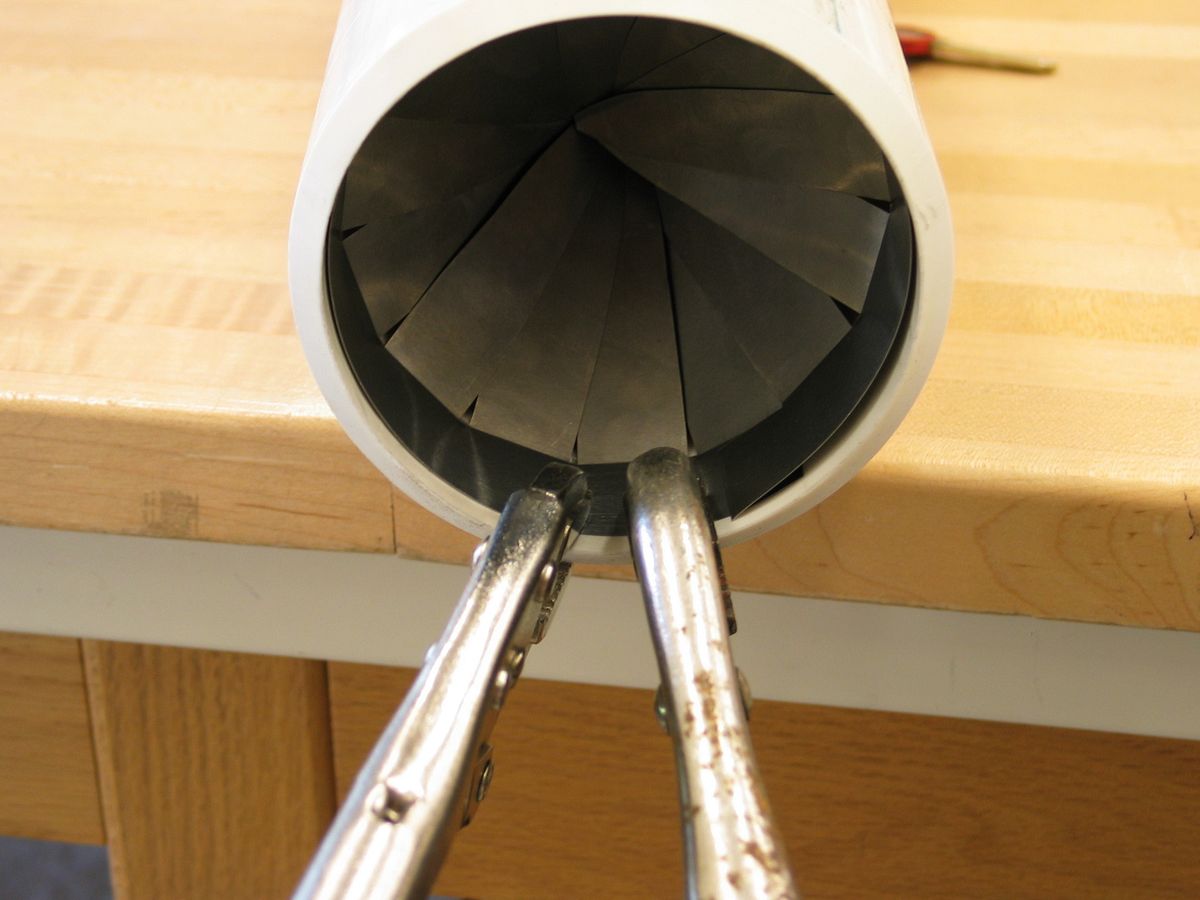 the core catcher in position with Vise-Grips holding a small segment flush against the barrel; remember not to start at exactly the end of the untabbed side else you will not be able to seat the final double rivet |
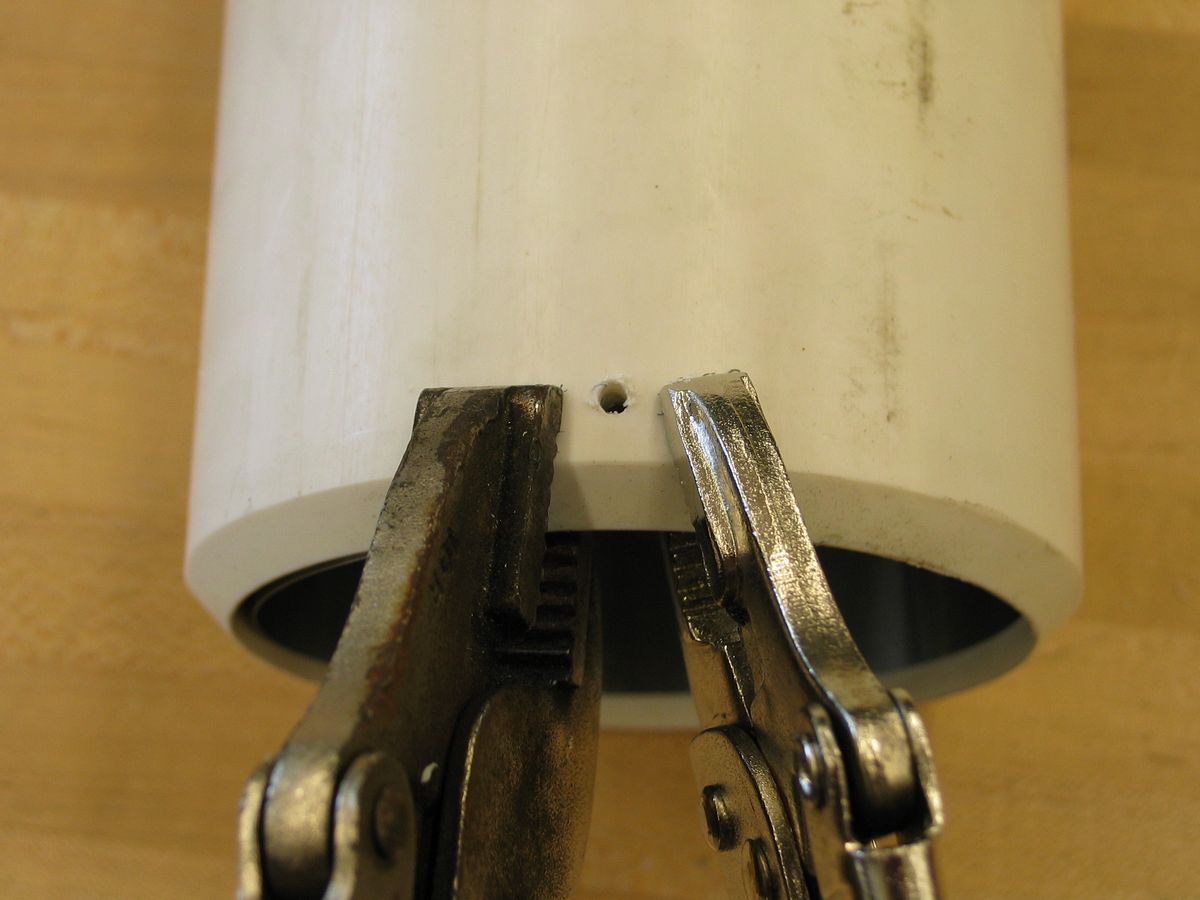 drill a 1/8" hole from the outside of the tube right between the Vise-Grips all the way down through the shim stock |
 pop rivet in place in first hole |
 pop rivet fastened in first hole |
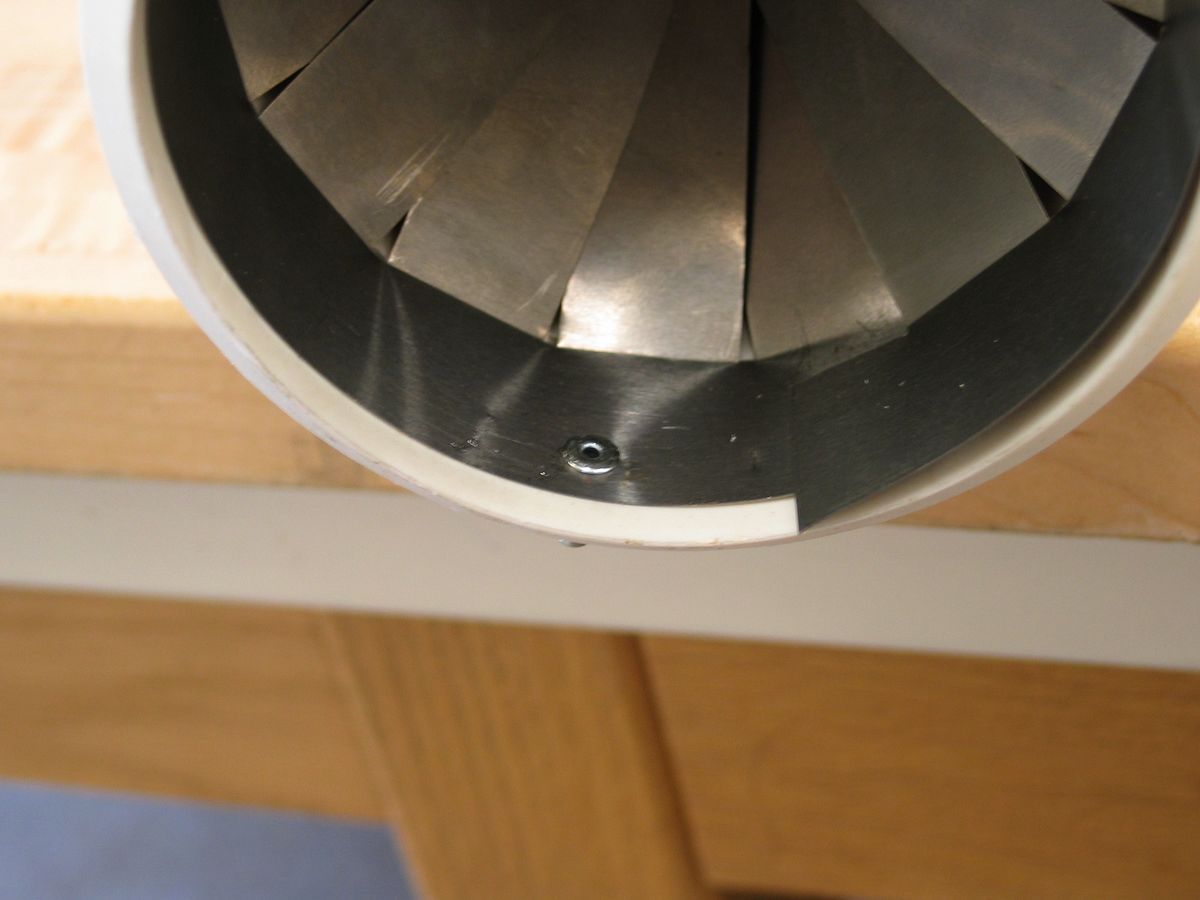
 view of the fastened pop rivet from the outside of the tube; you can remove this later with the heavy-duty wire cutters |
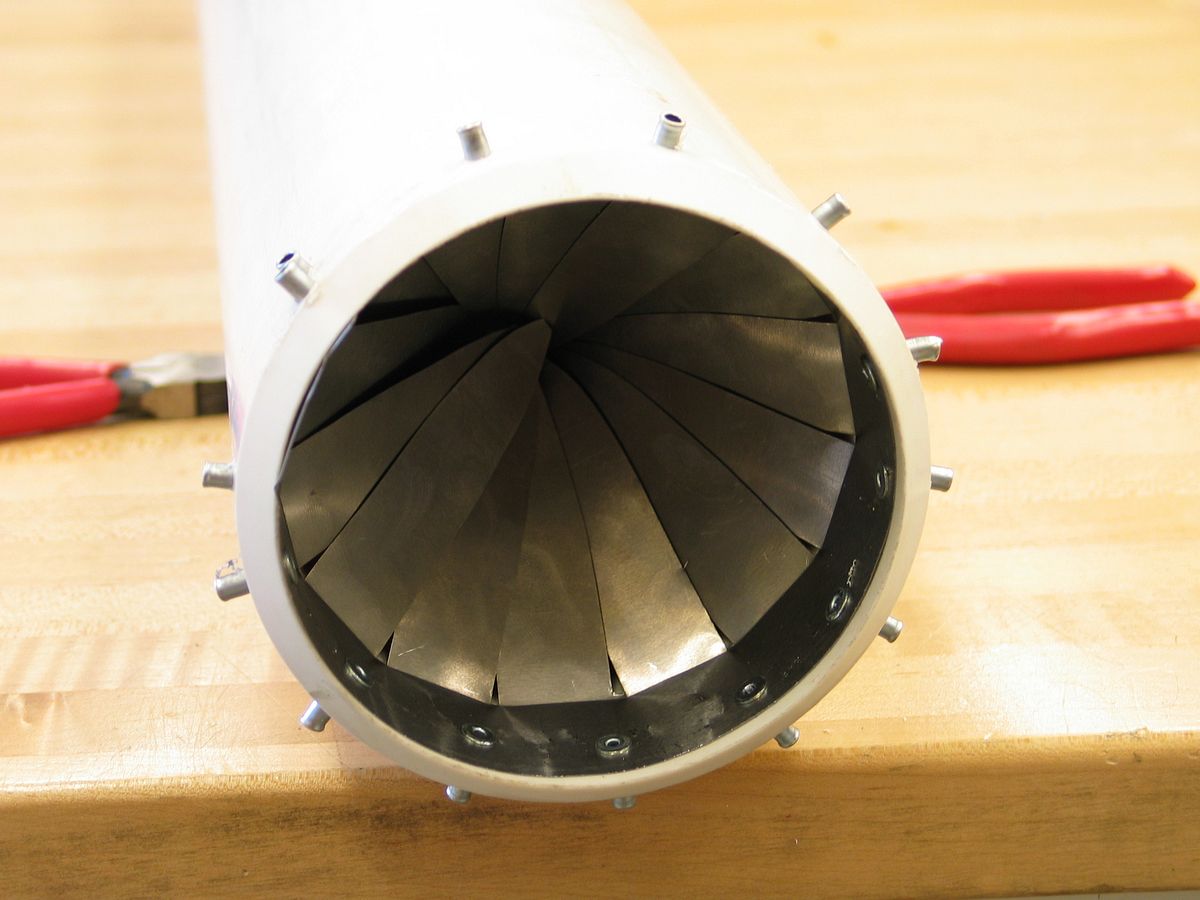 a general view of how things should look after working your way around the tube, and placing a pop rivet every 2.5-3.0 cm |
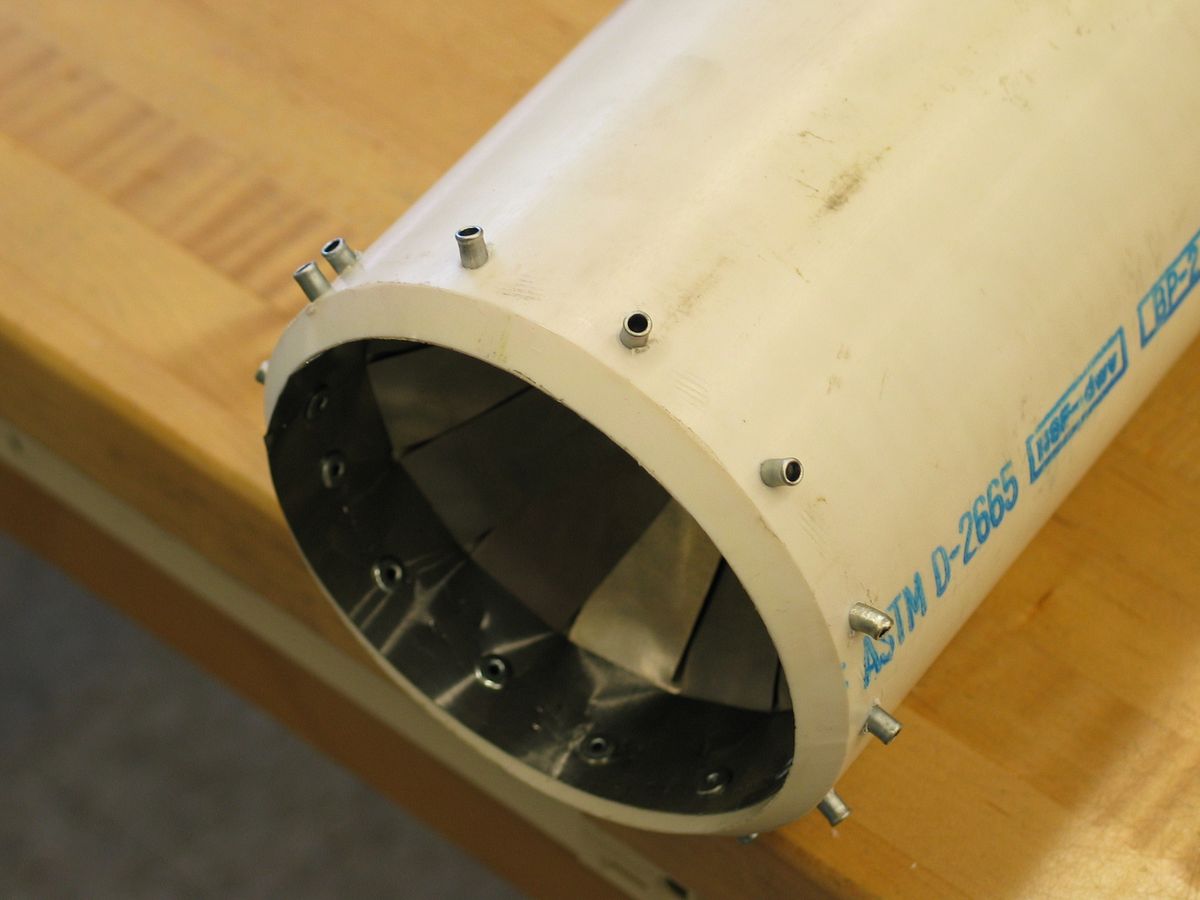 a second general view showing the double rivet at the tabbed end |
Driving the PVC:
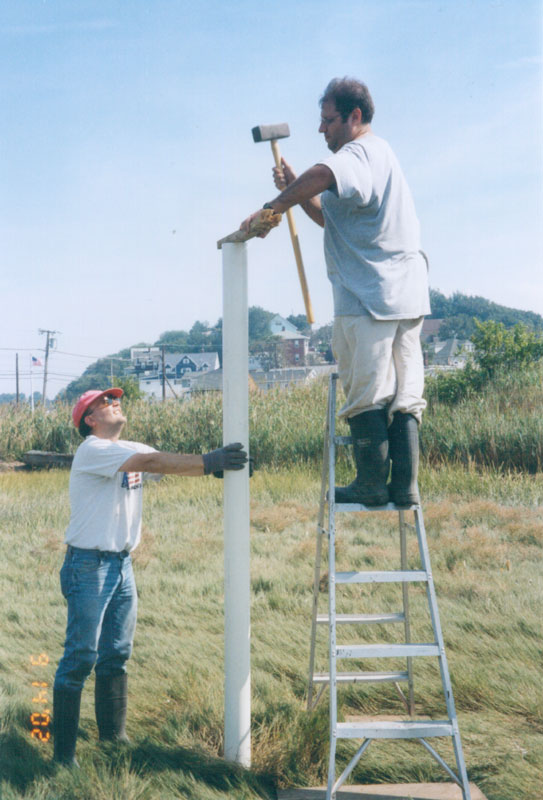
To drive the PVC tubing into the marsh, use a sledge hammer while standing on a step ladder. Use a 2x4 or similar piece of wood on top of the PVC to help distribute the force of the hammer blows, and to protect the edge of the tubing. For the first few hammer blows, have members of your coring team stand about 90° apart from one another with respect to the core tube to assure that it is vertical. Once the PVC has been driven in about 30 cm, it shouldn't need any more guiding. Leave about 30-40 cm of the PVC tube exposed above the marsh surface so it can be pulled out. If you hit rejection earlier, just cut the tube off leaving 30-40 cm available. Clicking on the thumbnail at the right will pop up a larger image.
Expandable piston for suction:
On analogy with an expandable rubber piston that provides suction for various lacustrine piston coring systems, I purchased some 2.5 cm (1") thick, 10 cm diameter neoprene rubber disks to make a similar piston for the PVC tubing. I purchased this at a local materials supplier (http://www.flnmar.com/), but you should also be able to find it in your area. Our Departmental MacGyver, John Sweeney, was able to build an awesome expandable piston using these rubber disks (see pics below).
Once the PVC has been hammered into the ground, I insert the piston into the top of the PVC as far as it will go using the simple piston pusher/puller John built. Basically, this piston pusher/puller is just a double nut on a threaded rod—I can screw it on to the threads at the top of the piston to push/pull it as necessary. Once in position, I use a standard 3/4" socket wrench on a extender handle to tighten up/expand the piston.
After tightening up the piston, the whole core is pulled out—see the "Extracting Cores from the Ground with a Mechanical Advantage" page for how to do this. At this point, I loosen up the piston with the socket wrench, and then pull it out with the piston pusher/puller.
This piston provides incredible suction—in one case where the core catcher was essentially turned inside out (an early version when I was using aluminum versus steel shim stock), the piston provided enough suction to retrieve the whole sediment column with the exception of the lower 20 cm which broke off!
As an engineering note, notice the thick plastic washer at the top of the piston—it is made of smooth, slippery Teflon. Our first piston design did not include this. So, when we went to tighten up the piston, at a certain point the surface friction between the tightening nut and upper metal disc became greater than that of the piston against the tube walls. Thus, the whole piston array would turn inside the tube, and it would never tighten and expand sufficiently. That's where this Teflon washer comes in—it prevents this from happening.
There is no actual designs or plan for the piston—it was basically built on the fly. But here are some images to that show you how it is built so you can attempt your own. The first four images are the piston itself with views from the top towards the bottom. The fifth image is the piston pusher/puller mentioned above. Clicking on the thumbnails below will pop up larger images.
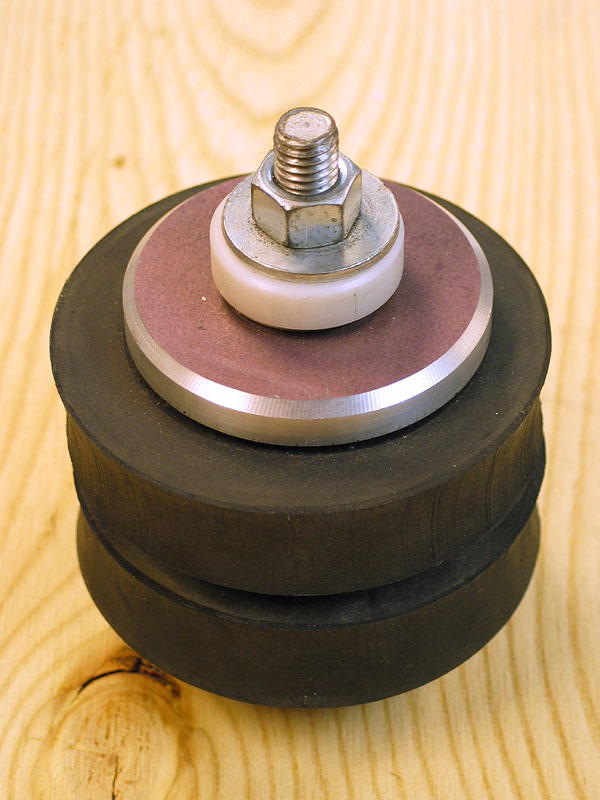 a top view of the piston; this uses 3/4" threaded bolt; the thick, white plastic washer is actually Teflon—the text above explains why it is needed |
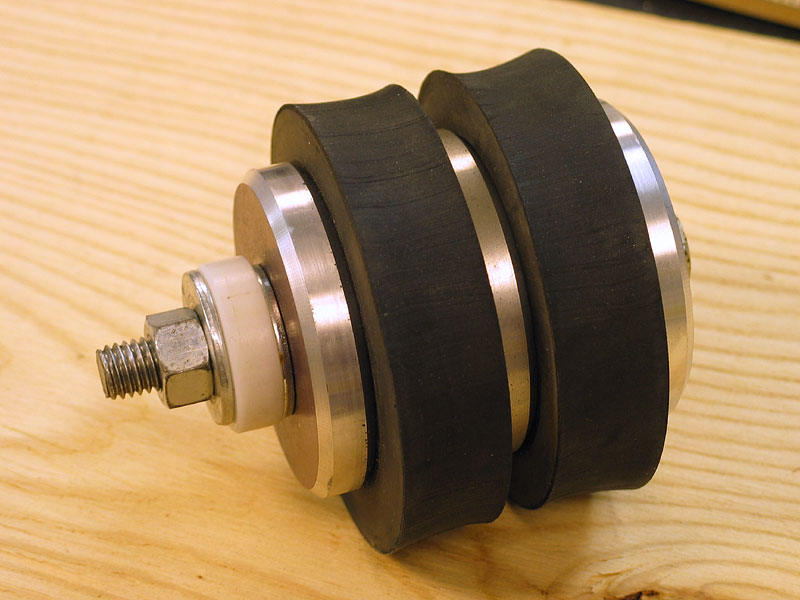 a side view of the piston |
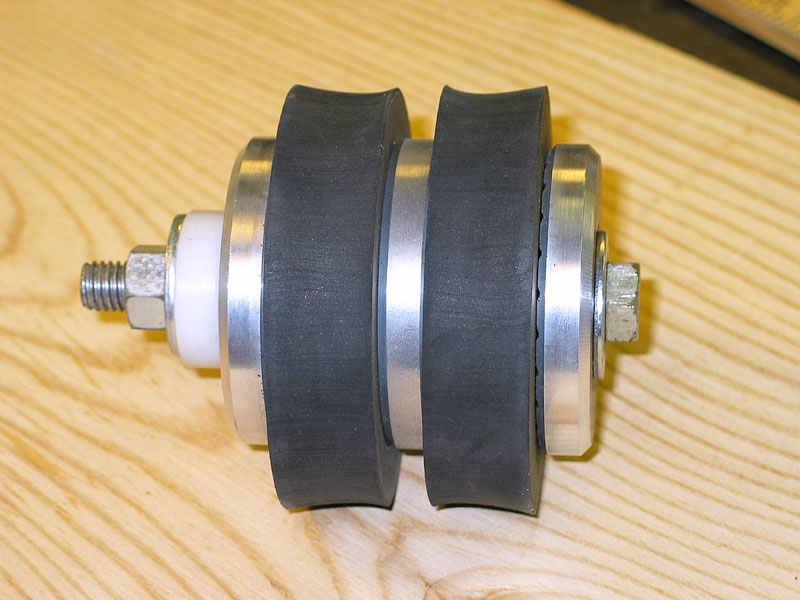 another side view of the piston |
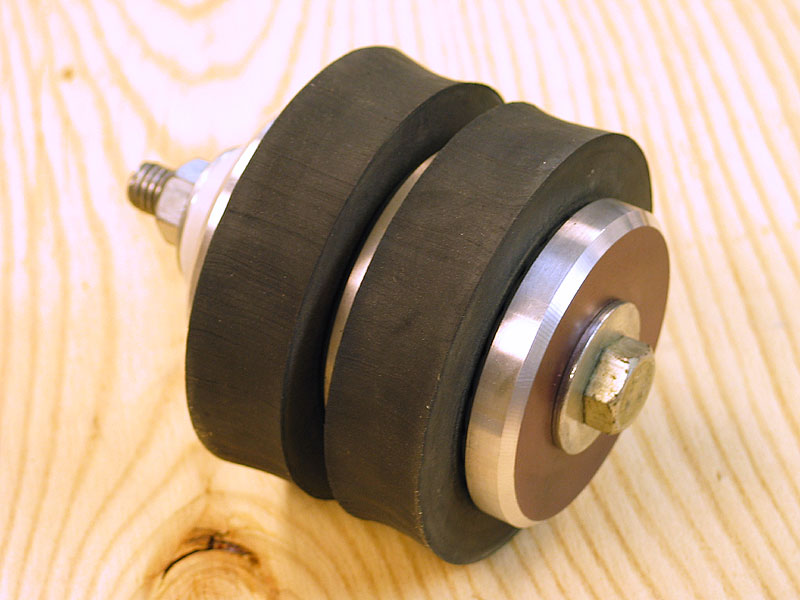 a view of the lower half of the piston; this is the top of the 3/4" bolt head (right), but this is the side that actually goes down into the tube as the threaded base (left) must be available for the piston pusher/puller tool |
 a view of the piston pusher/pull tool |
Sample 10 cm diameter marsh core:
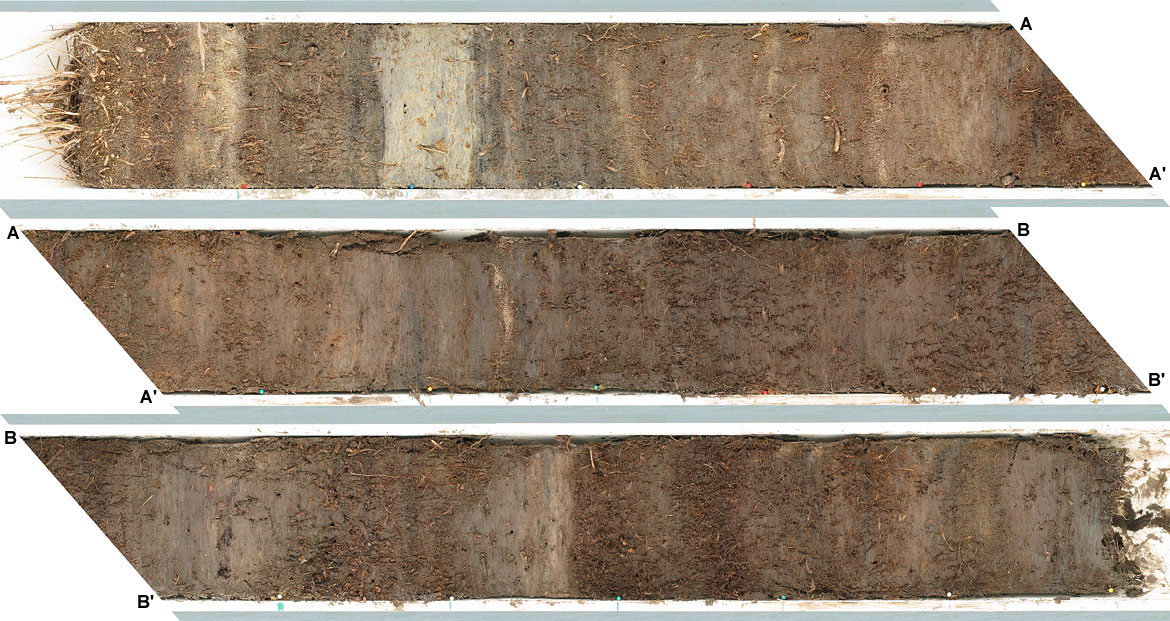
Here's a sample of a 10 cm diameter marsh core that was retrieved using this system (click for a larger version). As can be seen, there is essentiall perfect recovery, and the wide diameter helps minimize the deformation along the core sides that you would get with a narrower diameter system.